Before we begin, I want to stress that this is definitely not a production ready setup! This guide is more of a fun lab to create that can be run using the 12 months of free Azure products.
As a nice bonus it will give you the fundamental skills needed when it comes to doing it in a real production situation, even with an enterprise VPN appliance such as those provided by Cisco or Ubiquiti.
What you will need
- An Azure subscription
- A router that allows port forwarding
- A windows server that can be used to install RRAS (Routing and Remote Access Service) – Preferably not domain joined for security best practice
Setting up our Azure Environment
First we’re going to set up our Azure resources so that we have something to connect to.
I’ll take you through the steps using the GUI and give you Azure CLI commands (You’ll save lots of time this way!)
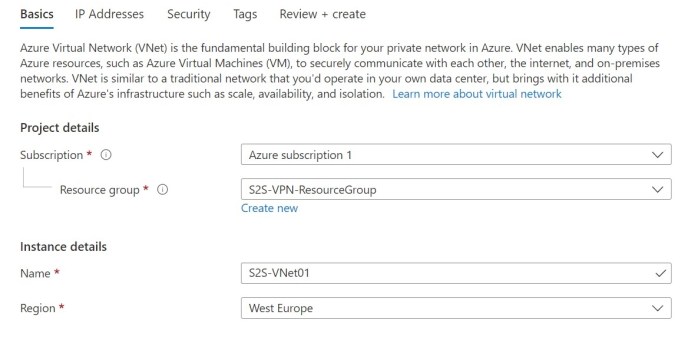
Azure Resource Group
First lets create our Resource Group. I’m using West Europe as the location and I’m going to call mine “S2S-VPN-ResourceGroup”
From home, go to Create a Resource > Search Resource Group > Add new and fill in the details. Alternatively run the below command

##Create Azure Resource Group##
az group create --name S2S-VPN-ResourceGroup --location WestEurope
Azure Virtual Network
Next up we need our Virtual Network and subnet.
From the Overview tab of our new resource group, hit the create button > search Virtual Network and hit create.
Lets call it S2S-VNet01

Or do it in one line with the below:
##Azure Network##
az network vnet create --resource-group S2S-VPN-ResourceGroup --name S2S-VNet01 --address-prefix 10.1.0.0/16 --subnet-name S2S-Subnet01 --subnet-prefix 10.1.0.0/24
Now go to your new VNet, find the Subnets tab and lets add our Gateway Subnet with the add Gateway subnet button and the below details (or Azure CLI command)

##Gateway Subnet##
az network vnet subnet create --resource-group S2S-VPN-ResourceGroup --vnet-name S2S-VNet01 --address-prefix 10.1.255.0/27 --name GatewaySubnet
Azure Virtual Network Gateway
This is the important bit, the virtual network gateway is what connects our Azure and On-Prem networks. These take around 30 minutes to create so once you set this off you have a good spot for a coffee break!
Before we do any of this though, we need to figure out how our On-Prem network will know where to connect to. For that we need a public IP to give to our Virtual Network Gateway.
Lets go to our Resource Group, hit create and search for Public IP address.

##Public IP##
az network public-ip create --name S2S-Gateway-PublicIP --resource-group S2S-VPN-ResourceGroup --allocation-method Dynamic
Now we have our Public IP lets create our Virtual Network Gateway.
From your resource group, choose the create button again, search Virtual Network Gateway and hit create.

##Virtual Network Gateway##
az network vnet-gateway create --resource-group ST-S2S-VPN-ResourceGroup --name S2S-VGateway01 --public-ip-address S2S-Gateway-PublicIP --vnet S2S-VNet01 --gateway-type Vpn --vpn-type RouteBased --sku Basic
Local Network Gateway
Now that we have a way of physically connecting our two networks, it’s time to give Azure the information it needs to work with our On-Prem network.
You’ll need to get the public IP for your On-Prem network, then as usual, hit the create button and search Local Network Gateway.
Fill in your details including your Public IP

##Local network gateway##
az network local-gateway create --gateway-ip-address %PUBLICIP% --name S2S-Azure-to-Home --resource-group S2S-VPN-ResourceGroup --local-address-prefixes 192.168.0.0/24
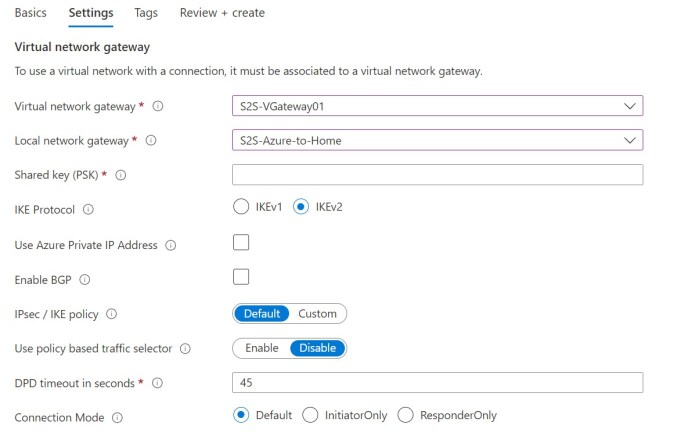
Create our Azure VPN Connection
Lets create the actual connection for our VPN to our On-Prem network. It won’t do anything until we configure our RRAS server but it means that we have all of our work done on the Azure side.
You’ll need a secure connection string ready to input on both sides to secure your connection.
From our Resource Group select Create and search for Connection.

##VPN Connection##
az network vpn-connection create --name S2S-AzureToHome-Connection --resource-group S2S-VPN-ResourceGroup --vnet-gateway1 S2S-VGateway01 --location westeurope --shared-key %SECUREKEY% --local-gateway2 S2S-Azure-to-Home
Setting up our RRAS server
Now you’re going to want to install the RRAS (Routing and Remote Access Service) role on your Windows Server. This server should have the desktop experience installed otherwise this won’t work.
To do this, either add the role via Server Manager or run the below in PowerShell
Install-WindowsFeature -Name RemoteAccess, DirectAccess-VPN, Routing -IncludeManagementToolsOnce the role is installed we want to start the configuration by running the Routing and Remote Access management console.
Right click your server name and select “Configure and Enable Routing and Remote Access

Click Next to begin the configuration process
Choose Secure connection between two private networks and hit next

Leave Demand-Dial Connections as Yes and hit next again

You can choose to assign IP Addresses automatically or from a specified range, I’ve left it as Automatically.

Now we can select Finish which will start our RRAS Services and launch the Demand-Dial Interface Wizard
Click next to take us to the Interface Name page. Choose a name to recognise our Interface by.

For the Connection Type specify Connect using virtual private networking (VPN)
Our VPN Type is going to be IKEv2

In the Destination Address box enter your Public IP for the Azure Virtual Network Gateway

When you get to the Protocols and Security page you should leave the default “Route IP packets on this interface” picked

When asked to enter the Static Routes for Remote Networks add the details for your Azure Address space and select a metric of 10.

Leave the Dial-Out Credentials page black as we are using a Pre-Shared Key
Click Finish when you get to the end of the Demand-Dial Connections wizard.
Once you’re back to the Network Interfaces tab right click our new AzureGW interface and select Properties
Go to the Security tab and select the Use preshared key for authentication button and enter your secure connection key that you chose earlier.

No for some reason we have to go to the Static Route tab and Right Click > New Static Route. We need to choose AzureGW as our interface and add the Azure address space like we did before.

Once this is saved we can go to our Interface tab, Right-Click Azure GW and select Connect.
As long as our details are correct you should quickly notice the status of our Interface change to connected.

Verify Connectivity
So, now we have a site-to-site VPN into Azure from our On-Prem network.
But how do we prove it’s working?
In my case I’ve created a Virtual Machine attached to our VNet. My VM has an internal IP of 10.1.0.4 and no public IP configured.
Lets try and ping it from the On-Prem Side of our VPN…

Looks good!
What about back from our Azure VM?

Now that we’ve proved we can set up a working VPN between our Azure and On-Prem networks, keep an eye on the blog for other interesting things we can do with a hybrid setup!